You know how some months if you get a few/couple of different kits you kind of pick a favourite from among them? This month I just couldn't pick one over the other I just LOVED each of them!! But I guess if you held a gun to my head I'd have to pick the
Album kit this month! I just loved the papers and even more so, the embellishments Pam put together with this kit! There were 3 packages of Prima goodies (rose blooms, fabric blooms & a beautiful crystal flourish) and the trims!!...oh! so beautiful!! I loved the green leaf vine trim and the pink rossette trim, and always a favourite the creamy lace trim! I made the above l/o using a bunch of these goodies. Did a little machine stitching with a touch of masking with some black chalk ink. Did I mention the beautiful rub-ons too? (also in the kit......
just as a point of note, ALL the things you see on on the layouts of the MCS design team, other than some cardstock, can be found in the kit, we don't suppliment things on the pages from our own stash or from 'add-on' kits! So when you order the MCS kits you know you can re-create the work you're seeing done by the design team without any big extra expenses) The rose in the top right corner was made from cardstock using the
water distress method you can find to the right of my blogsite. Here are a few close-ups of the above l/o....the photo is one I took of my youngest daughter walking along a path in Autumn of last year....


This kit allowed for many color combinations, for the next l/o I went with some of the lavender colours. The photo is one I took of my youngest up at the cottage, we always do a little crafting there and we had made up the little butterfly headband she's wearing in the photo....

The butterflies were made from the Prima packaging, I just cut out a butterfly shape with a pair of scissors (I know! it's time to get a butterfly punch....if anyone know of a good one please let me know!) ....again the small white lavender blooms I made with a little cardstock using the
Water Distessed Flowers method....


In this 3rd layout I scrapped a picture of my newest baby niece Jade (a professional shot taken by Stephanie Robins Designs). I've been saving this photo for the right papers and I think I found them in this kit.....

I cut a few of the little ribbon rosettes from the trim to embellish my green vine trim and I extended the size of one of the roses in the kit with a little bin of white cardstock and pink chalk ink (again using the
water distess method). Here are a few close-ups....


Another beautiful kit I got to design with this month was the
Main Kit. I just love that each and every month Pam puts something fun in the kit that allows us to get a little creative. This time around there was some resist paper by Pink Paislee. The paper doesn't look like much when you first take it out but then when you start applying inks and glimmer mists, these wonderful patterns appear. For the l/o below I used a couple of chalk inks on the resist paper (Denim Blue and Chestnut Brown, on the paper behind the photo)....

The leave's were cut from one of the muted patterned papers in the kit (I made extras by tracing one of the designs over and over and handcutting them)....There's also a nice swatch of brown tulle in the kit, I used part of it to create the backing for the diamond shaped pattern to the right of the photo. I machine stitched the diamond pattern and added the blue gems from the kit to the cross sections....here are a few close-ups


I really loved the muted pretty shades in this kit. So for my next l/o I went with the soft greens, and to add to the softness I added a hint of smokey grey carstock. The branch and leaves were designs I cut from one of the patterned papers, I added a little green & brown chalk inks to make them stand out more. I've been running a challenge for last month and this month called 'Scrap the Scrapper' with a really amazing prize. So I thought I would do another page this month as a sample for the challenge ....here I listed 3 favourites of mine for 2010
....Music: Marianas Trench
....TV: Anything on the Food Network
....Movie: The Perfect Getaway (love movies that leave you guessing all the way to the end!).....
NOTE: If you would like to play along in my challenge and have a chance to win a really awesome prize, see the link for a photo of the prize! (and at the same time get scrapping about yourself!) You can find my challenger here ~~>
Scrap the Scrapper Challenge ....I also give a bunch of helpful tips on how to get a really good photo of yourself in the challenge thread, so come join us!

The large blooms in the above layout are the soft & pretty blooms by BoBunny called Cream Gardenia Petals. I altered them a tiny bit by watering down some Tim Holtz alcohol ink (colour: Meadow) and applying it to the inner center of the bloom with a Q-tip. Just apply to the lower part of the petal, you only need to do a few layers of the center petals, no need to do all of them. Here are some close-ups....


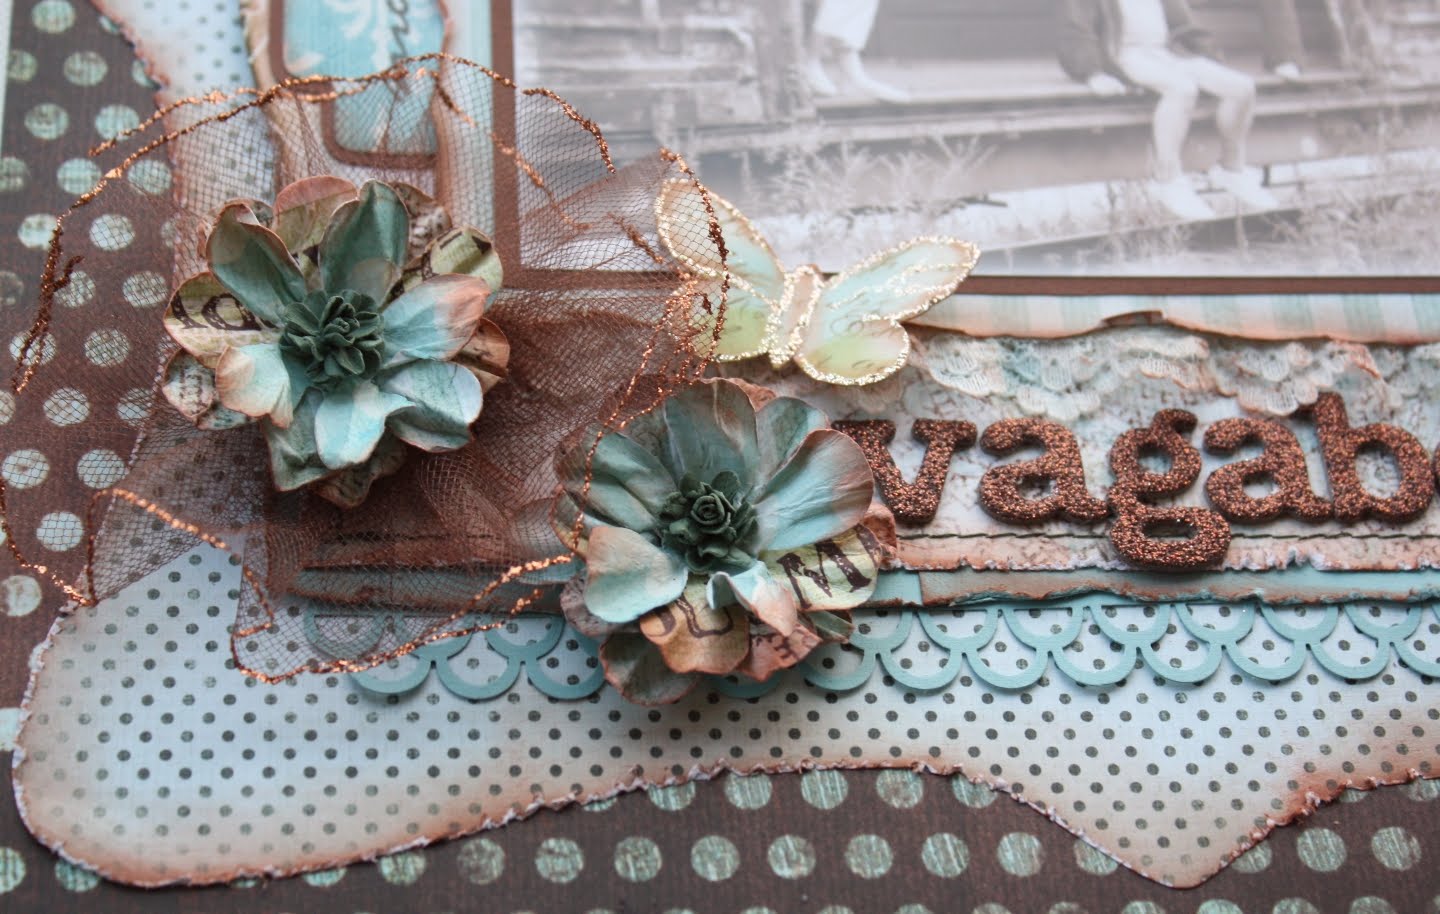
A third l/o I made with this kit, I went with a more nostalgic look. I love the combination of aqua with deep brown/bronze colours. This past summer when we were on a hike up at the cottage we came across an abandoned railway car. The kids immediately started climbing, so out came my camera. I got this photo of my girls and their Opa (my Dad) in one of the cars. I printed the photo in sepia to get more of a vintage look to it....

The blooms on this page were made by using the Paper Shapers Retro Flower punch on some of the patterned papers in the kit and then giving them the
'water distress' treatment. I used a bit of the brown Tulle in the kit on the bloom to the far left. The butterflies were again made from the Prima packaging from the blooms in the kit. Here are a few close-ups...


And last but not least there was the gorgeous
Limited Edition kit that I got to work with this month. If you enjoy doing the 'fussy cutting' on your l/o's, this is the kit for you! This kit is just PACKED with gorgeous papers and the embellishments are wonderful too! Pam worked hard to get this amazing collection into this kit in time for the November release, the collection is BasicGrey Curio and boy are this papers beautiful IRL! ....And the extra's in the kit....you're gonna love these, loads of Prima blooms/& floral vines, cameos, sequin trims, pearl strands, layered stickers, rub-ons and so much more! Here is the first l/o I made with this kit...

Again I made the butterflies for this page using the Prima packaging and the
'Embossed Butterfly' Tutorial I posted at the right side of my blog. Here are a few close-up pic's...


This 2nd l/o I made with the LE kit I used a kind of a 'joke' photo my husband took of me when I needed a photo for the 20 questions blog feature at the MCS blog. My friend Julie Howard said I had to give her a humorous photo, so he took a bunch of pic's of me 'rolling in my scrapbooking blooms'....I ended up going with a different photo, but thought I would scrap this one for fun :)

I did a little fussy cutting and machine stitching for this one. The bird cage is a rub-on from the kit. Here are a few close-up detail shots....


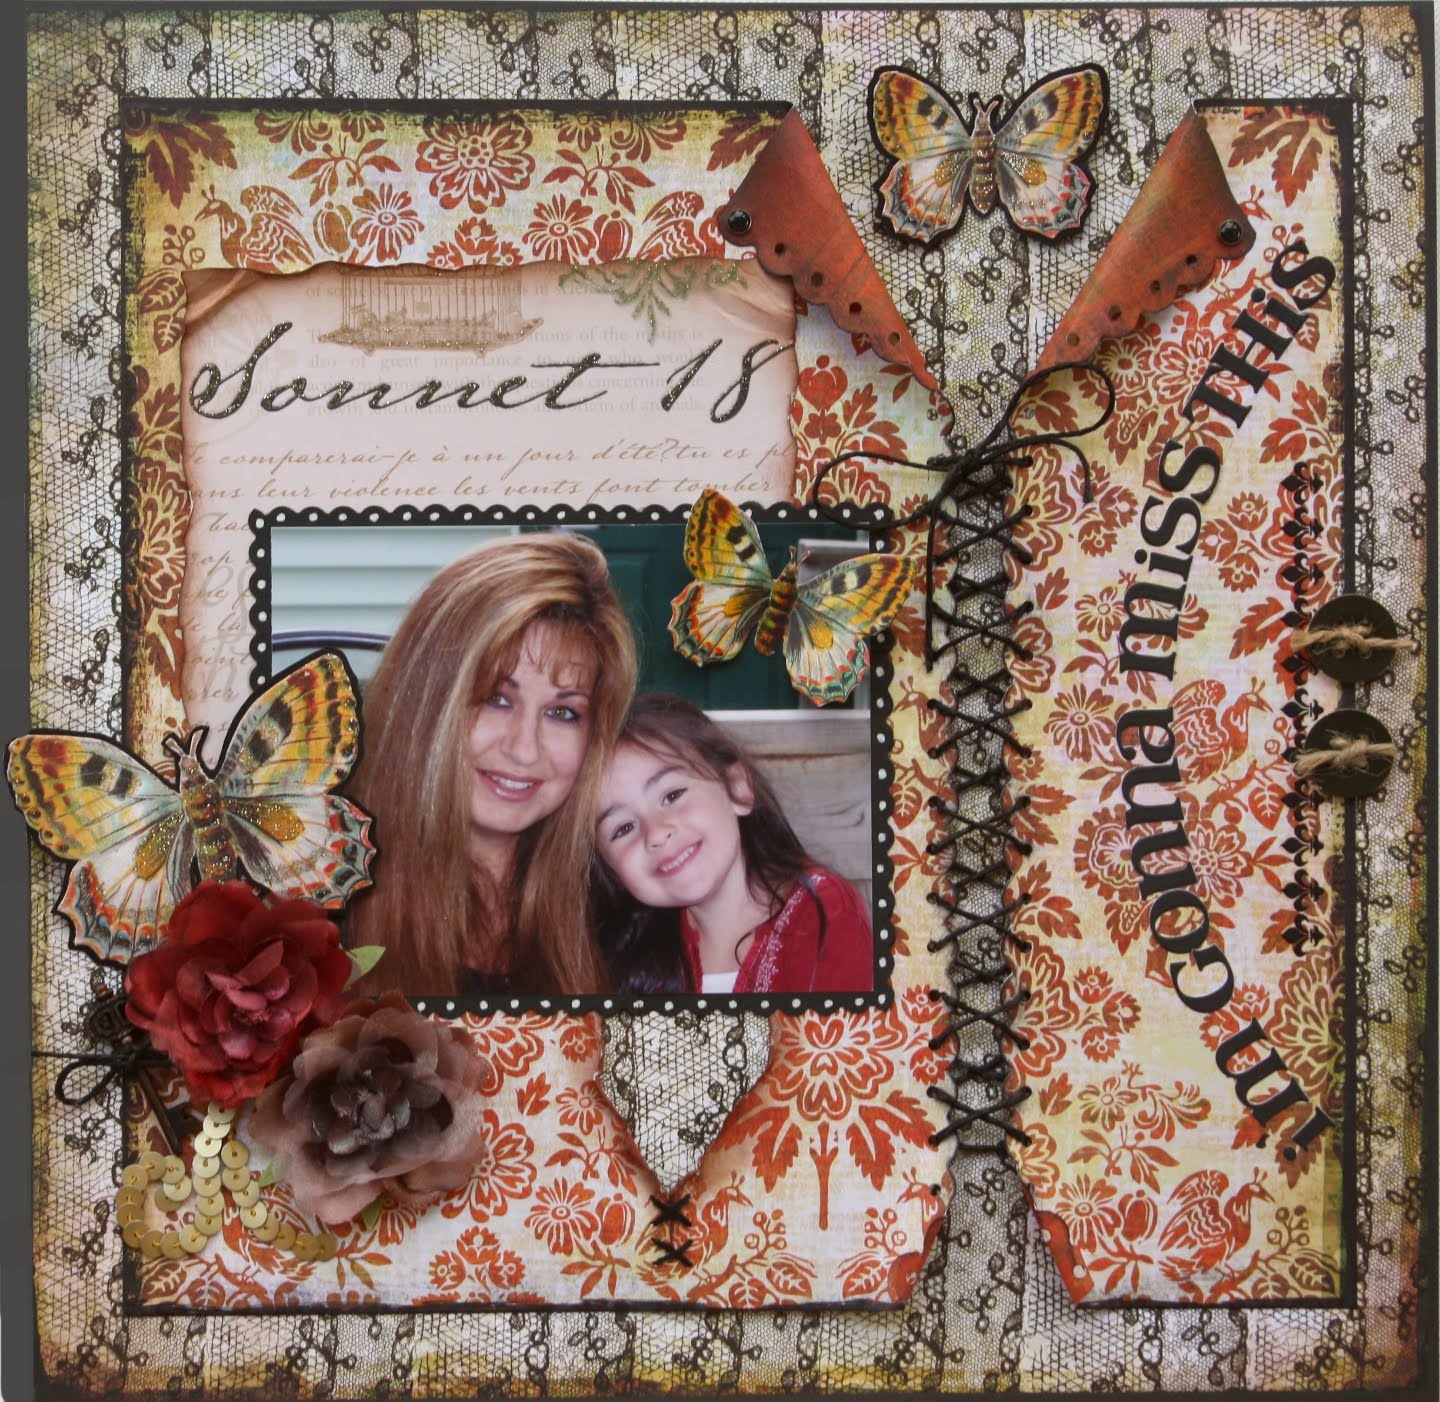
A 3rd layout I made with this kit I went with the romantic lacy looking papers, I did a little bit of corset stitching with it....The photo is one my husband took of my youngest daughter and I when we were on summer vacation a couple years back....

The butterflies were cut from one of the patterned papers in the kit (there are also some beautiful rub-on butterflies too)...


And a 4th l/o I made with this kit I went with the warm yellows/appricot colors mixed with soft aqua. I was amazed at how many different looks you could get with this kit! Again, everything you see on these pages are from the kits, no need for any add on's or taking from your stash to make up these pages....take my word for it, the value of this kit is worth every penny!

I did some more fussy cutting for this l/o along with a little bit of stitching. Here are a few close-up details shots of this page...


Because I had 3 kits to work with this month I only had time to make 4 l/o's with the LE kit but I can tell you I've got loads more goodies in this kit and could easily make more pages with the papers & embellies I have left. I think you girls are going to love this one!
Thanks so much for stopping by.....and just a reminder.....My Creative Scrapbook is still in the midst of their HUGE Sketch contest ....ton's of amazing Prizes to be won, you can find the link to this contest here ~~~>
MCS Sketch Contest
~Gabrielle xxx